
Shopkit setup
One of the first things you should do after installing Shopkit is set up your Site Options. To get started, click Site Options in the top menu.
Let’s walk through the different sections:
1. General
Site name
This should be your business name. It will show up in the title of your visitors’ browser windows, and on PDF invoices.
Featured products
Featured products show up in the left sidebar on every page, directly beneath your logo. This is useful for promoting special deals.
Show quantity in stock
If this box is checked, your visitors will be able to see how many items are remaining in each product’s inventory.
Order notifications
Add email addresses to this section for each person you want to notify when a new order is placed. You can notify different people for certain products. To notify someone of all orders, keep the Products field blank.
Error notifications
Add an email address here to notify someone when Shopkit runs into a technical error.
2. Shipping & tax
Mailing address
Check this box if you want to make sure your customers give their mailing address when they place an order.
Weight unit
Choose the unit of measurement you want to use if you plan to calculate shipping by weight.
Shipping methods
You can add as many shipping methods as you want, and restrict them by country. Want to offer worldwide ground shipping, free shipping to your country, and airmail shipping to select countries? It’s simple with Shopkit.
Click Add the first entry or the + Add button to the right of the Shipping methods box. A pop-up window will appear with the fields required for this shipping method.
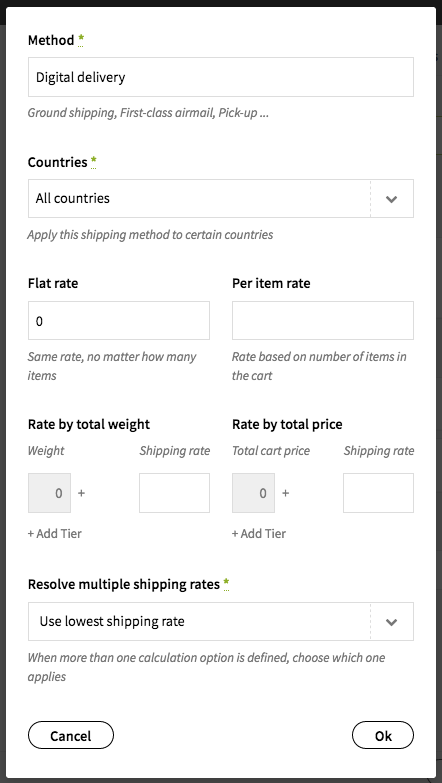
Method is the plain-language description of this shipping method. It could be something like Ground shipping (2-4 weeks), or Free delivery. Customers will see this text in the drop-down menu when they check out.
Countries lets you select which countries can have this shipping method. If someone isn’t from an applicable country, they won’t be able to select this shipping method.
The next four fields offer different ways to calculate the shipping rate. Flat rate charges the same amount for each transaction, no matter how many items there are or how expensive or heavy the transaction is. Per item rate lets you charge a certain amount for each item in the cart, no matter how heavy or expensive it is.
Rate by total weight and Rate by total price are more complex, and they let you define different shipping tiers depending on the total weight or price.
You’re not limited to one calculation method. This is where Resolve multiple shipping rates comes in. If you decide to define multiple calculation methods, you can select whether the highest or the lowest rate should apply. This lets you do awesome things like a base flat rate, plus an incremental per item rate if people order a lot of items.
Once you fill out all the information for the shipping rate, click Add to close the pop-up window. Be sure to Save your changes!
Tax rates
You can define an unlimited number of tax rates to cover all the possible countries your shoppers might be coming from. As you did with the shipping methods, click Add the first entry or + Add to define a tax rate.
In the pop-up window that appears, enter the tax rate in decimal format in the Tax rate field. (For example, if your sales tax is 13%, type 0.13).
In the Countries drop-down list, select the countries that this tax rate applies to. You can choose All countries to define a tax rate that applies to all the countries which haven’t been specifically selected.
Default country
This dropdown menu helps Shopkit calculate shipping and tax if we don’t know the visitor’s country yet.
Include tax
Check this box, and all prices in your shop will be handled on a tax-inclusive basis. The formula Shopkit uses to calculate tax when this option is selected is: tax = (tax rate * price) / (1 + tax rate)
3. Payment
Currency options
Enter the appropriate values for Currency code, Currency symbol, Symbol position, Decimal point, and Thousands separator to determine how prices are formatted in your shop.
Because the currency symbol is defined here, you don’t need to put symbols in other price fields, for example when defining shipping rates or product prices.
Pay later settings
Choose which types of users are allowed to pay later. By default, this is restricted to administrators.
Payment gateway settings
You’ll need an account with at least one payment gateway – Square, Stripe, or PayPal – to start selling with Shopkit. Be sure to set the Status to disabled if you don’t want to use a gateway.
4. Discounts
Here, you can add as many Discount codes and Gift certificates as you like. Each code comes with a link that you can share.
5. Design
Last but not least, the Design tab is where you can change the site’s logo, colours, and background image.
License setup
Be sure to add your Kirby license key and Shopkit license key in site/config/config.php. This needs to be done directly in the text file; there is no option to add the license key from the Panel.